Hello everyone! It
feels like it’s been ages since my last post so apologies all around. I am participating in an alumni theatre
production at my college and have spent more time working on sets then in the
kitchen. The performances are this
weekend, which means I’ll be in rehearsals every night this week so it’s likely
my disappearing act will continue for a short while. I promise to make my usual Wednesday post
with my share items and veggie person, but not sure about how much cooking I’ll
be doing.
All that being said, I haven’t completely ignored my
culinary responsibilities!
On Friday I made good use of my kale, swiss chard and
collard greens. I didn’t want my lovely
leafy greens to go bad this week so I looked for recipes that would make the
best use of them. My boyfriend’s
birthday was also this week so I wanted to make an extra special dinner for a
great guy to enjoy. Normally I’d bake a
cake for him, so this was a real departure from his past two birthdays –
homemade dinner and store-bought pastries!
Thanks to our neighborhood bakery, Patsy’s, for our delicious
desserts!
I started working on prep for this dinner around 6pm on
Friday and we ate around 10pm…I spent the entire 4 hours in the kitchen! I’m sure for the more experienced cook (and
someone with more than one large sauté pan) the time would be drastically
reduced, but what can I say…it was a labor of love.
This dinner was all about stuffing - Roasted,
Stuffed Red Peppers, Stuffed
Collard Greens, and Swiss
Chard Stuffed Garlic Bread.


The prep for these dishes took so long due to the lone large
sauté pan. Both the kale for the stuffed
red peppers and the collards had to be cooked and cooled before I could get
into the rest of the cooking. Then I had
to use the same pan for the red pepper stuffing and again for the collard green
stuffing. Let’s just say my pan got a
workout on Friday night and was washed and dried approximately 350 times…at
least that’s how it felt!
Let’s break it down by dish, shall we!
I love red peppers – raw, grilled, roasted, whatever. When I saw this recipe using kale I knew it
would be a winner. It also used brown
rice, which the collard recipe used as well so I figured it making both means
no random extra rice hanging out in the refrigerator languishing unused until
it was thrown away. It’s also a really
nice vegetarian dish so if you’re having friends or family over and they don’t
eat meat you can whip these up and everyone can enjoy them!
Made on their own this dish would be fast and easy to prepare even though it has quite a few components in the stuffing – chopped onion, red pepper, kale, brown rice, lemon juice, garlic, parmesan cheese, and pine nuts.
Made on their own this dish would be fast and easy to prepare even though it has quite a few components in the stuffing – chopped onion, red pepper, kale, brown rice, lemon juice, garlic, parmesan cheese, and pine nuts.
In retrospect I should have cooked the kale first to free up
my lone sauté pan, but I didn’t and started with prepping the pepper halves. Oh well…live and learn!

The kale (with the stalks removed) then needs to be cooked (just
dump a few tablespoons of water into a sauté pan and cover), strained in a
colander and finely chopped. Sauté pan wash & dry #1
 Then you take your sauté pan and add the chopped pepper and
onion until the onions are nice and golden, add in the kale and other goodies
and remove from heat.
Then you take your sauté pan and add the chopped pepper and
onion until the onions are nice and golden, add in the kale and other goodies
and remove from heat.
Spoon the stuffing mix into the pepper “shells”, sprinkle on
some of the leftover pine nuts, and bake at 400 degrees for about 15-20
minutes. Sauté pan wash & dry #2
I made some ingredient switches from the recipe (which the
author suggested as alternatives). I
used ground turkey instead of venison, whole grain rice instead of bulgur (I
don’t even know what that is), and Paul Newman brand tomato basil sauce (on
sale!) instead of a low-sodium option (because I wanted it to actually taste
good).

Now it’s time to make your filling! The recipe didn’t call for this, but I put a
tiny bit of olive oil in the pan before adding the ground turkey and onions. Let the turkey cook fully, then add in the
cooked brown rice, onion powder and garlic powder. I know a full tablespoon of the seasonings
looks like a lot, but it tastes fantastic so don’t skimp! I added a little salt and pepper as well even
though the recipe didn’t call for it.

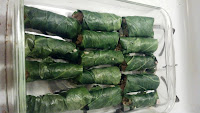
Now it’s time to stuff and roll the filling into your
collard green halves…it’s kind of like an arts and craft project. *This recipe is probably easiest when you
have LARGE collard leaves, but mine were on the medium to small side and
managed to make due. It just resulted in
leftover filling, which I plan on making a pasta sauce with since I have zero
time to cook this week. My greens also had
some holes here and there so I doubled up with some of the smaller greens to “patch”
them up when needed. I also overlaid
some of the smaller greens to create a larger leaf to stuff and roll and it
worked pretty well.
Take a few spoonfuls of the filling and tightly roll the
greens around it. The photo in the
recipe shows the filling in the middle of the green, but I found it easier to
spoon the stuffing a little bit closer to the end of the green so I could make
the roll tighter. Some of the stuffing
will fall out of the ends, but just try to stuff it back in there as best you
can. Place the rolls into a glass baking
dish and when they’re all in there cover them with the tomato sauce. Pop in the oven and cook at 350 degrees for
about 20-25 minutes. 4th and
final sauté pan wash


I saved the easiest recipe for last. It doesn’t get any more basic than this…and
the best part – NOT SAUTE PAN NEEDED!!!
The recipe is big enough for 2, one pound loaves of bread, which was
waaaaay more than I needed to make so I just played around with the ingredient
amounts and improvised to make 1 small loaf.
I bought a small loaf of ciabatta bread from the grocery store.
 Cut the stalks out of your swiss chard and break the leaves
into small pieces. In a bowl, mix the
greens with some olive oil and set aside.
Cut the stalks out of your swiss chard and break the leaves
into small pieces. In a bowl, mix the
greens with some olive oil and set aside.
Take a baking sheet and put a layer of aluminum foil on
top. Place the loaf of bread on the foil
and cut deep slits in the bread without cutting through the bottom.
Melt some butter and add minced garlic. With a brush, coat the insides of the bread
slices with the butter and garlic mixture.
Stuff the oil coated swiss chard into the slits in the
bread.
I got creative and added some fresh mozzarella I had the in
fridge (cut into small cubes) and stuffed that in with the swiss chard.

Wrap the bread with the aluminum foil and pop the baking
sheet into the oven at 350 degrees until the bread is cooked through. I had mine in there for about 10 minutes, but
I think 15-20 minutes would be best if you prefer it a little crispier.
That’s it! So simple
and REALLY full of great flavor.


No comments:
Post a Comment